Home | About Me | Developer PFE Blog | Become a Developer PFE

Contact

Categories

On this page

LINQ: When are my database connections closed?
ASP.NET GridView Grouping and Checkbox Lists
One-to-Many: What is the best way to store the values?

Archive

Blogroll

Disclaimer
The opinions expressed herein are my own personal opinions and do not represent my employer's view in any way.

Sign In

# Friday, 23 July 2010
Friday, 23 July 2010 02:02:43 (Central Daylight Time, UTC-05:00) ( Database | Development | LINQ | Performance )

So, I was working with a customer who is writing their first application using LINQ. They had previously been bitten by the failure to close and dispose their SqlConnection objects. This is actually a fairly common problem and usually leads to those pesky SqlExceptions detailing that there are no connections left in the pool.

So, since LINQ to SQL abstracts out much of the direct database interaction, they were concerned about when the underlying SqlConnections are closed. I will walk through how I answered their question using a few of my favorite tools:

To start off, I created a simple SQL Table called Users:

UserTable

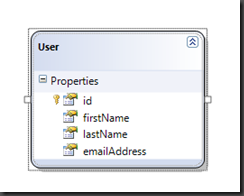
Then, I created a simple LINQ to SQL dbml:
Linq2SqlDBML

Now that the plumbing is in place, I can write some simple code to return the data from the table and display it to the console window:

   1: LinqConnectionSampleDataContext db = 
   2:     new LinqConnectionSampleDataContext();
   3:  
   4: Table<User> users = db.GetTable<User>();
   5:  
   6: IQueryable<User> userQuery =
   7:     from user in users
   8:     orderby user.firstName
   9:     select user;
  10:     
  11:  
  12: foreach (User user in userQuery)
  13: {
  14:  
  15:     Console.WriteLine("ID={0}, First Name={1}", 
  16:                         user.id, 
  17:                         user.firstName);

So, now when the application is executed, the output is as follows:

ConsoleSampleOutput

So, since Linq to Sql uses an underlying SqlConnection to do its work, we can set a breakpoint on the Close() method of that class in WinDBG. If you are unfamiliar with this great debugging tool, you can find a simple walkthrough on how to set it up here.

There are a number of ways to set a breakpoint in managed code in WinDBG. Here are the steps that I followed:

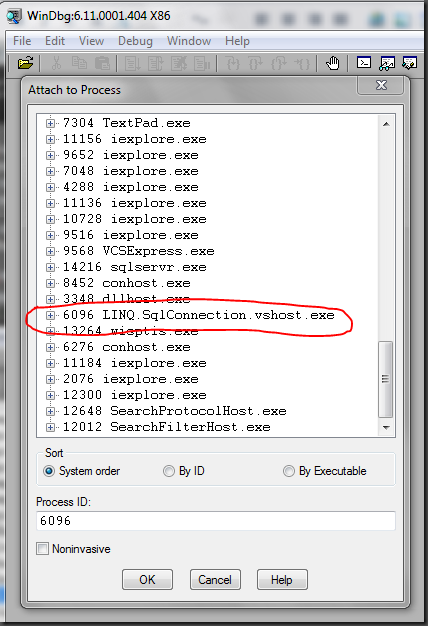
Step 1. Launch WinDBG and attach to the process in question.
Windbg_AttachToProcess_RedCircle

Step 2. Load the SOS extension into WinDBG by executing:

.loadby sos mscorwks

Step 3. Set the managed breakpoint using the !bpmd command. For this step, the !bpmd command accepts a variety of parameters. Basically, you can pass it either:

  • MethodDescr address.

  • Combination of Module Name and Managed Function Name

I chose the latter method because it’s relatively quick and I knew exactly what I wanted. So, the syntax for this method is:

!bpmd <module name> <managed function name>

You can get the module name from visiting the SqlConnection page up on MSDN. On this page, we can get the module name and the namespace to the class:

MSDN_sqlconnection

From this, we can get both parameters necessary:

  • Module Name: System.Data.dll
  • Managed Function Name: System.Data.SqlClient.SqlConnection.Close

So, our command in WinDBG becomes:

   1: !bpmd System.Data.dll 
   2: System.Data.SqlClient.SqlConnection.Close

Once you enter in this command, you should get output similar to the following in the WinDBG window:

0:014> !bpmd System.Data.dll System.Data.SqlClient.SqlConnection.Close
Found 1 methods...
MethodDesc = 544a0418
Setting breakpoint: bp 5455DC80 [System.Data.SqlClient.SqlConnection.Close()]

Step 4. “Go” in the debugger and wait for your breakpoint to be hit.

For this, the command is simply “g”.

0:014> g

Eventually, your breakpoint will be hit in the debugger and you should get output similar to the following:

Breakpoint 0 hit
eax=5457da68 ebx=04d7e9dc ecx=0185cd30 edx=018e56b0 esi=01870d80 edi=04d7e9a4
eip=5455dc80 esp=04d7e860 ebp=04d7e868 iopl=0         nv up ei pl nz na po nc
cs=001b  ss=0023  ds=0023  es=0023  fs=003b  gs=0000             efl=00000202
System_Data_ni+0xcdc80:
5455dc80 55              push    ebp

Step 5. Print out the call-stack.

The command to print out the call stack in SOS and WinDBG is “!clrstack”:

0:008> !clrstack

This will print out the managed call stack, which turns out to be:

OS Thread Id: 0x1d70 (8)
ESP       EIP     
04d7e860 5455dc80 System.Data.SqlClient.SqlConnection.Close()
04d7e864 77e20586 System.Data.Linq.SqlClient.SqlConnectionManager
                    .CloseConnection()
04d7e870 77e20554 System.Data.Linq.SqlClient.SqlConnectionManager
                    .ReleaseConnection(...)
04d7e87c 77e1da35 System.Data.Linq.SqlClient.
        ObjectReaderCompiler+ObjectReaderSession`1[...].Dispose()
04d7e888 77e1ddac System.Data.Linq.SqlClient.
        ObjectReaderCompiler+ObjectReaderSession`1[...].CheckNextResults()
04d7e894 77e1df2c System.Data.Linq.SqlClient.
        ObjectReaderCompiler+ObjectReaderBase`1[...].Read()
04d7e8a0 77e1ea2d System.Data.Linq.SqlClient.
        ObjectReaderCompiler+ObjectReader`2[...].MoveNext()
04d7e8ac 004f1a12 LINQ.SqlConnection.Program.Main(System.String[])

So, if you’re having trouble parsing this, the take away here is that when you iterate through a Linq resultset and you get to the end, the ObjectReaderSession will automatically close the Connection to the database.

Now, this is a simple HelloWorld code sample for retrieving a result-set and there are obviously a number of ways to do the same thing. The customer’s code was closer to the following:

   1: using (IEnumerator<User> enumerator = 
   2:           context.ExecuteQuery<User>(sqlStatement).GetEnumerator())
   3: {
   4:  
   5:        while (enumerator.MoveNext())
   6:        {
   7:  
   8:               // Do something here
   9:  
  10:         }
  11:  
  12: }

In this situation, we get an IEnumerator<T> back from the database call and iterate through it. Now, this part is very important. If you are iterating through the result set to completion – the connection will be closed the same as the above. However, if you do something like this:

   1: using (IEnumerator<User> enumerator = 
   2:     db.ExecuteQuery<User>(sqlStatement).GetEnumerator())
   3: {
   4:     while (enumerator.MoveNext())
   5:     {
   6:  
   7:         Console.WriteLine("ID={0}, First Name={1}", 
   8:             enumerator.Current.id, 
   9:             enumerator.Current.firstName);
  10:         
  11:         // Stop iterating after this record.
  12:         break;
  13:  
  14:     }
  15:  
  16: }

Please note the “break” statement. Essentially, if you are NOT iterating through to completion, the call stack looks like:

OS Thread Id: 0x251c (11)
ESP       EIP     
0522e73c 5455dc80 System.Data.SqlClient.SqlConnection.
                    Close()
0522e740 77e20586 System.Data.Linq.SqlClient.SqlConnectionManager.
                    CloseConnection()
0522e74c 77e20554 System.Data.Linq.SqlClient.SqlConnectionManager.
                    ReleaseConnection(...)
0522e758 77e1da35 System.Data.Linq.SqlClient.ObjectReaderCompiler+
                    ObjectReaderSession`1[...].Dispose()
0522e764 77e1ea12 System.Data.Linq.SqlClient.ObjectReaderCompiler+
                    ObjectReader`2[...].Dispose()
0522e768 00691bde LINQ.SqlConnection.Program.Main(System.String[])

The connection will NOT be closed until you call Dispose() on the ObjectReader (IEnumerable) object. This means that if you happen to write some code without the Using… statement when returning data like this:

   1: IEnumerator<User> enumerator =
   2:     db.ExecuteQuery<User>(sqlStatement).GetEnumerator();
   3:  
   4: while (enumerator.MoveNext())
   5: {
   6:  
   7:     Console.WriteLine("ID={0}, First Name={1}",
   8:         enumerator.Current.id,
   9:         enumerator.Current.firstName);
  10:  
  11:     // Stop iterating after this record.
  12:     break;
  13:  
  14: }

The SqlConnection.Close() method will NOT be called. This is because you have full control over the lifetime of the IEnumerator<T> object and you should know when you are done with it.

Now, along those lines, you may be asking yourself – what if I did something like this:

   1: LinqConnectionSampleDataContext db = 
   2:     new LinqConnectionSampleDataContext();
   3:  
   4: Table<User> users = db.GetTable<User>();
   5:  
   6: IQueryable<User> userQuery =
   7:     from user in users
   8:     orderby user.firstName
   9:     select user;
  10:     
  11:  
  12: foreach (User user in userQuery)
  13: {
  14:  
  15:     Console.WriteLine("ID={0}, First Name={1}", 
  16:                         user.id, 
  17:                         user.firstName);
  18:  
  19:     break;
  20: }

Where you break before you iterate through to completion? In that situation, Dispose() will still be called on the IQueryable<T> object. How? Because of a compile-time optimization we do. We insert a finally statement after the userQuery has been used. This compiles down to (in IL):

 try{
L_005d: br.s L_0084 L_005f: ldloc.s CS$5$0002 L_0061: callvirt instance !0...get_Current() L_0066: stloc.3 L_0067: ldstr "ID={0}, First Name={1}" L_006c: ldloc.3 L_006d: callvirt instance int32 LINQ.SqlConnection.User::get_id() L_0072: box int32 L_0077: ldloc.3 L_0078: callvirt instance string LINQ.SqlConnection.User::get_firstName() L_007d: call void [mscorlib]System.Console::WriteLine(string, object, object) L_0082: br.s L_008d L_0084: ldloc.s CS$5$0002 L_0086: callvirt instance bool [mscorlib]System.Collections.IEnumerator::MoveNext() L_008b: brtrue.s L_005f L_008d: leave.s L_009b
}finally{
L_008f: ldloc.s CS$5$0002 L_0091: brfalse.s L_009a L_0093: ldloc.s CS$5$0002 L_0095: callvirt instance void [mscorlib]System.IDisposable::Dispose() L_009a: endfinally
} L_009b: ret .try L_005d to L_008f finally handler L_008f to L_009b

The text in red is my emphasis. So, the moral of this story, when you take control of the data yourself, you MUST call dispose on the IEnumerable<T> object when you are done with it.

Enjoy!

Friday, 23 July 2010 00:52:47 (Central Daylight Time, UTC-05:00) ( ASP.NET | Database | Development )

I was helping a co-worker today with one of his screens and realized that it may make a useful little tutorial for all those other folks out there. This was somewhat interesting because it follows up pretty well on my previous post as I talk about saving records with a 1 to many relationship. Basically, he needed to develop a screen similar to the following:

image

This is actually a pretty simple page, but there are a few places that might cause a hiccup or two:

  • Grouping items in a checkbox list.
  • Getting the value for each Attribute (ie: the PK of the Attribute itself)

For the first item - grouping inside of a checkbox list. This actually won't work - there is no way to specify groups of checkboxes or additional properties to define checkboxes or any of that...so, the only real option is to put the checkboxes into a GridView control. Now, I've done this type of grouping many times previously and it never really felt right. After Googling the problem with him - "grouping items in a gridview" - the first result is a great series of classes posted here. The only problem with this method is that it is focused on grouping within reports. The difference in this situation is that we wanted the checkboxes to maintain their state between postbacks. If you perform a postback using the article's method, then not only will your checkboxes lose their state (kinda sorta) but the Header row for each group will disappear.

Then, I happened to recall something similar written by Matt Dotson and his use of cell-spanning to accomplish a similar feat. He has a great blog entry posted here to illustrate the concept. In-fact, he also has a great CodePlex project here that has a bunch of useful "Real World" ASP.NET webcontrols in it. One of these useful controls is a GroupingGridView. This is essentially a GridView to perform the actual Grid Grouping. By default, using Matt's sample, the GridView renders like this:

image

And the XHTML to output this simple page is:

<rwg:GroupingGridView ID="GroupGrid" DataSourceID="PubsDataSource" 
                    AutoGenerateColumns="False" GroupingDepth="2"
                    DataKeyNames="au_id" runat="server">
    <Columns>
        <asp:BoundField HeaderText="State" DataField="state" />
        <asp:BoundField HeaderText="City" DataField="city" />
        <asp:BoundField HeaderText="Last Name" DataField="au_lname" />
        <asp:BoundField HeaderText="First Name" DataField="au_fname" />
        <asp:BoundField HeaderText="Phone" DataField="phone" />
        <asp:BoundField HeaderText="Address" DataField="address" />
        <asp:BoundField HeaderText="Zip Code" DataField="zip" />
        <asp:CheckBoxField HeaderText="Contract" DataField="contract" />
    </Columns>
</rwg:GroupingGridView>

Nice, clean and simple - and it gets us most of the way there. Instead of actually displaying the grouped items in the center of the cell, though, we needed the Group text to display at the top of the cell. This is a very simple change to his source code (available on the CodePlex site). In fact, it's only 1 additional line of code in his SpanCellsRecursive method (see the marked line below):

private void SpanCellsRecursive(int columnIndex, 
                                        int startRowIndex, 
                                        int endRowIndex)
        {
            if (columnIndex >= this.GroupingDepth 
                    || columnIndex >= this.Columns.Count )
                return;

            TableCell groupStartCell = null;
            int groupStartRowIndex = startRowIndex;

            for (int i = startRowIndex; i < endRowIndex; i++)
            {
                TableCell currentCell = this.Rows.Cells[columnIndex];

                bool isNewGroup = (null == groupStartCell) || 
                    (0 != 
                        String.CompareOrdinal(currentCell.Text, 
                                            groupStartCell.Text));

                currentCell.VerticalAlign = VerticalAlign.Top;
                if (isNewGroup)
                {
                    if (null != groupStartCell)
                    {
                        SpanCellsRecursive(columnIndex + 1, 
                                           groupStartRowIndex, i);
                    }

                    groupStartCell = currentCell;
                    groupStartCell.RowSpan = 1;
                    groupStartRowIndex = i;
                }
                else
                {
                    currentCell.Visible = false;
                    groupStartCell.RowSpan += 1;
                }
            }

            SpanCellsRecursive(columnIndex + 1, groupStartRowIndex, endRowIndex);
        }

Now that gets us the Grouped items in a GridView for our pretty display. Just using that wonderful GridView gets us a page that looks like this:

image

With only this small amount of code in the XHTML:

    <RWC:GroupingGridView runat="server" ID="GroupingGridView1" 
                AutoGenerateColumns="False" 
                GroupingDepth="1" 
                ShowHeader="False">
         <Columns>
            <asp:BoundField DataField="GroupName" ShowHeader="False" /> 
            <asp:TemplateField>
                <ItemTemplate>
               <asp:checkbox runat="server" 
                             id="checkbox1" 
                             Text='<%# Eval("AttributeName") %>'
                 Checked='&lt;%# DirectCast(Eval("ParentId"),Int32) > 0 %>'                />
                </ItemTemplate>
            </asp:TemplateField>                               
        </Columns>
    </RWC:GroupingGridView>

And then you just bind this grid behind the scenes:

    Protected Sub Page_Load(ByVal sender As Object, _
                            ByVal e As System.EventArgs) _                                              Handles Me.Load

        If Not IsPostBack Then

            Dim attributeList As _
                    System.Collections.Generic.IList(Of Attribute)
            attributeList = Me.GetAttributes()

            With Me.GroupingGridView1
                .DataSource = attributeList
                .DataBind()
            End With

        End If
    End Sub

Now, from a look and feel perspective - we're just about done. But what about getting the values out of the checkbox - so that we know:

  1. Whether the checkbox was selected.
  2. What the value of the checkbox is - ie: the primary key of the Attribute object.

The checked property is relatively simple to get out of the page. In the Submit button's event, you loop through the rows in the GridView and extract out the instance of the Checkbox for each row and then check the "Checked" property of the checkbox to determine if the checkbox is selected:

For Each row As GridViewRow In Me.gvGrouping.Rows
  If row.RowType = DataControlRowType.DataRow Then
    Dim obj As CheckBox = _
         TryCast(row.FindControl("chkbxPermissions"), _
                                CheckBox)
    If obj IsNot Nothing Then
        Response.Write(String.Format("Row {0}: checked value is {1} <br>", _
             row.RowIndex.ToString, obj.Checked.ToString))
     End If
  End If
Next

Now this will write to the page the RowIndex and a value indicating whether the checkbox was checked. This will not, though, give me the AttributeId for these checkboxes because the ASP.NET 2.0 Checkbox Control does not have actually have a "Value" property like it does in a CheckBoxList control. So, what do we do? Well, there are two solutions:

  1. Use the DataKeyNames property of the GridView to specify that the AttributeId is our key for this GridView and then extract it from the row.
  2. Create a new CheckBox control that will include a new property to hold the Checkbox's Value.

Given the two options mentioned above - there are no real differences. The actual size of the page is EXACTLY the same and the speed to access the GridView's DataKey property versus a new property on a new CheckBox control is no different. I'm choosing to go with the latter as I know of a few other situations where a control like this might come in handy.

So, since it is not already there - let's create a new control that derives from the existing CheckBox control. We'll call this new control a ValueCheckBox control and add a new property:

Namespace WebControls
    Public Class ValueCheckBox
        Inherits CheckBox

        Public Property CheckboxValue() As String
            Get
                Return DirectCast(ViewState("checkboxvalue"), String)
            End Get
            Set(ByVal value As String)
                ViewState("checkboxvalue") = value
            End Set
        End Property
    End Class
End Namespace

Then, we add the new Register tag to the top of our page:

<%@ Register TagPrefix="sp" Namespace="WebControls" %>

And then slightly change our XHTML to include a reference to the new checkbox in our GridView:

<RWC:GroupingGridView runat="server" ID="gvGrouping" 
                AutoGenerateColumns="False" 
                GroupingDepth="1" 
                ShowHeader="False">
         <Columns>
            <asp:BoundField DataField="GroupName" ShowHeader="False" /> 
            <asp:TemplateField>
                <ItemTemplate>
                    <sp:ValueCheckBox runat="server" 
                       ID="chkbxPermissions" 
                       Text='<%# Eval("AttributeName") %>' 
                       Checked='&lt;%# DirectCast(Eval("ParentId"),Int32) > 0 %>' 
                       CheckboxValue='<%# Eval("AttributeId") %>' />          
                </ItemTemplate>
            </asp:TemplateField>                               
        </Columns>
</RWC:GroupingGridView>

Lastly, you tweak your submit button code-behind to get at the new control:

        For Each row As GridViewRow In Me.gvGrouping.Rows
            If row.RowType = DataControlRowType.DataRow Then
                Dim obj As WebControls.ValueCheckBox = _
                    TryCast(row.FindControl("chkbxPermissions"), _
                                WebControls.ValueCheckBox)
                If obj IsNot Nothing Then
                    Dim checked As Boolean = obj.Checked
                    Dim checkboxValue As String = obj.CheckboxValue
                End If
            End If
        Next

And now you're done. My previous post discusses the best way to store these values, so I won't go into that level.

Enjoy!

Friday, 23 July 2010 00:43:03 (Central Daylight Time, UTC-05:00) ( Database | Development )


If you've been a developer for any period of time, you have probably come across this question. If you're given a one-to-many relationship in a table, what is the best way to insert those values into a database. For example, let's say that you had a Person table and an Attribute table. Each person can have more than one attribute associated with them, hence the 1-to-Many relationship. Your database diagram is probably something that looks like this:

bs_1_to_many_relationship

So, if given a Person and a list of Attributes for that person, what is the best way to insert rows into the PersonAttributeXref table? Well, if this is the first time that you've done something like this, you probably came up with something like this:

  1. Create a Stored Procedure that accepts a UserId and AttributeId value and then insert one row into the PersonAttributeXref table.
  2. For each Attribute selected, you simply loop through them and call out to that Stored Procedure once for each item you would like to insert.

So what is wrong with this method? Not a whole lot if you are only inserting a few (1 to 3) rows into the PersonAttributeXref table. However, when inserting more than those few rows into the table, you will begin to notice a performance hit. Why? Well, if you are using something like the Enterprise Library to perform your inserts, your code probably looks a little something like this:

Public Sub InsertAttribute(ByVal userId As Int32, ByVal attributeId As Int32)
     Dim db As Database = DatabaseFactory.CreateDatabase()
     Using dbCommand As Common.DbCommand = _
           db.GetStoredProcCommand("USP_BS_INSERT_PERSONATTRIBUTEXREF")

        db.AddInParameter(dbCommand, "@UserId", DbType.Int32, userId)
        db.AddInParameter(dbCommand, "@AttributeId", DbType.Int32, attributeId)

        Try
             db.ExecuteNonQuery(dbCommand)
        Catch ex As SqlClient.SqlException
            '// Insert error handling here.
        End Try
    End Using
End Sub

The problem with something like this is that each time you call out to this method, a new connection is established with the database and the insert is then completed. The act of establishing a connection out to the database is very expensive - even using Connection Pools. In-fact, during some tests that I ran locally, if you are calling out to this method 100 times - it will probably take you in excess of about 937,500 ticks to complete the transaction. You also don't have the option of rolling back the rows inserted if something fails.

Well, chances are, you've probably noticed this issue and have tried to overcome it a variety of ways. In-fact, the next thing that I've seen people try is to concatenate the attributeId's into a delimited string and then pass that string to a single stored procedure:

        Dim attributeIdList As New System.Text.StringBuilder()
        For i As Int32 = 1 To MAXINSERTS
            If attributeIdList.Length > 0 Then
                attributeIdList.Append(",")
            End If
            attributeIdList.Append(i.ToString)
        Next

And then in the Stored Procedure, you perform the String parsing using a simple UDF like that which you can find here and then you perform the insert there - all wrapped in a nice little transaction. If you have done something like this successfully, you have probably seen transaction times somewhere in the neighborhood of 625,000 ticks for 100 inserted rows. Wow! That's a nice a performance boost, right? Yes, it is - however, I've always been a firm believer that the SQL Server is no place to be concatenating and splitting strings. Just because you can do it, doesn't mean it should be done. In-fact, I'd argue that splitting strings and concatenating strings makes your procedure a lot less supportable than performing similar actions in .Net code.

Faced with these two options, I'm likely to propose a third option. In .NET, though, you have the option of using Transactions (feel free to look here or here or even here for a description). Transactions in .NET work the same way as Transactions in SQL. Basically, you wrap one or more operations in a Transaction and if all operations succeed, then the transaction is committed; if one or more fail, then you Roll it back. In the context of this example, though, how would it work? Well, assuming you have an array of AttributeId's, your code would probably look like this:

Public Sub InsertAttributeWithTransaction(ByVal userId As Int32, _
                                          ByVal attributeIdList As Int32())
     Dim db As Database = DatabaseFactory.CreateDatabase()
     Using dbCommand As Common.DbCommand = _
            db.GetStoredProcCommand("USP_BS_INSERT_PERSONATTRIBUTEXREF")

         db.AddInParameter(dbCommand, "@UserId", DbType.Int32, userId)
         db.AddInParameter(dbCommand, "@AttributeId", DbType.Int32, -1)

          Using connection As Common.DbConnection = _
                                    db.CreateConnection()
              connection.Open()
              Dim transaction As Common.DbTransaction = _
                                    connection.BeginTransaction()
              Try
                  For i As Int32 = 0 To attributeIdList.Length - 1
                       dbCommand.Parameters("@AttributeId").Value = _
                                                    attributeIdList(i)
                       db.ExecuteNonQuery(dbCommand, transaction)
                  Next
                   ' Commit the transaction
                   transaction.Commit()

              Catch ex As Exception
                  ' Rollback transaction 
                   transaction.Rollback()
               End Try

               connection.Close()
           End Using
       End Using
 End Sub

As you can see, this is pretty nice and straight-forward. You instantiate the connection, create the transaction, process the inserts and then depending upon the result of the operations, you either Commit() or Rollback() the transaction. So, what is the benefit of this? Well, aside from the obvious readability (and consequently supportability) improvements - you also get a speed improvement too! In-fact, for the same 100 rows that I inserted previously using the first or second approach, the total time to complete the transaction here is between 156,250 ticks and 312,500 ticks. That compared with with the 937,500 ticks in option 1 and 625,000 ticks in Option 2 - represents an incredible speed improvement - and that's only for 100 rows. Which, I'd imagine, is the high-end in UI defined cases.

If anyone has experienced issues with using .NET transactions or performance foibles, I'd love to hear about them. Please feel free to either comment here or e-mail me at greg at samurai programmer dot com.